It’s all about the lyrics, baby 

I’m such a lyrics person. But of course, right? I write poetry. I was an English Lit major. Words speak to me. I love a clever turn of phrase. I love repeating it and twisting it around my brain.

A few weeks ago I turned the car on and when the radio turned on I heard this, “is she not more than the curve of her hips? Is she not more than the shine on her lips?” And before I knew it the song was over but I was hooked. Downloaded it and listen to it daily.

If you don’t know this song you absolutely should:

True Sadness by the Avett Brothers

Listen to it more than once. Let the words settle into your bones. We all have it within us.

Have a gorgeous Saturday, dear friends.

Xoxo,

Stef

Pumpkin Chocolate Chip Pancakes

IMG_0703.JPG

I’m sorry. I simply couldn’t help myself this morning.

A friend on Facebook posted that she made pumpkin chocolate chip pancakes last week and I’ve been thinking of it ever since. This morning I woke up and said yes, this is the day.

I started checking out different recipes online. There were so many variations! When I realized I was out of baking soda that limited my options to using Bisquik instead of a completely from scratch recipe.

So this is what I did, and you’ll have to forgive my rough estimations. This recipe does seems to have a lot room for adjustment according to taste so feel free to be creative!

2 cups Bisquik
4 big scoops of puréed pumpkin (see scoop in the pic)
2 eggs
1 tsp vanilla extract (approx)
1 tsp pumpkin spice (approx – I did 4 or 5 shakes)
1/4 cup brown sugar (approx)
3/4 tsp cinnamon (approx)
1/2 tsp ginger
Chocolate chips to taste, I used 1/3 a 12 oz bag of semi-sweet
Milk, according to batter density (about a cup, for my preference)

Okay, I mixed all the above together and added milk. The consistency was too thick for my first batch so I added more milk & it was perfect & moist.

IMG_0704.JPG

IMG_0698.JPG

Then I made homemade whipped cream in the mixer. I always chill my mixing bowl & whip attachment in the freezer first, then threw in a cup of heavy whipping cream, a couple tablespoons of sugar & a teaspoon of vanilla. Turned the mixer on high and it was done in about 90 seconds.

Buttered the stack, added maple syrup & a heaping dollop of whipped cream & it was so so yummy. The chocolate chips were melty & soft. The pumpkin flavor was evident. The texture was moist. Just perfect!

IMG_0699.JPG

Enjoy the yummy things once in awhile! Love & light today, my dear life warriors.

Xoxo,
Stef

Chicken & Rice soup – so simple & easy

I’m so tired of trying to think of things to cook at night that my whole family will eat I could just spit. In fact, I may have. The fact is: I will never make everybody happy. So I’ve just given up. I mean, sometimes I’ll specifically make things by request – but what the kids request is not what my husband likes. And sometimes not what I like. What my husband and I like is not what they like. Sometimes what my husband likes is not what ANYBODY likes. But him. (In which case he’s on his own).

So the other day I got home from work at 6:30 and my husband ran out the door to his play rehearsal with a yell over the shoulder, “The kids haven’t eaten yet!” I kicked off my shoes, put my hair up, and went to inspect the fridge. Then the pantry. Looking for inspiration. Then my gaze settled on the rice. Rice. Yum. Chicken. Yum. The kids should, possibly, maybe, eat this. Fingers-crossed.

From the pantry I grabbed a bag of Uncle Ben’s Converted Rice, an onion, a couple garlic cloves, canola oil and a can of Campbell’s Cream of Chicken soup.

From the fridge/freezer I grabbed a bag of frozen chicken tenders, a pint of half & half, butter, white wine and Better Than Bouillon concentrated stock (which we like so much better than bouillon cubes).

This is the part where I confess to not taking ANY pictures. I was HUNGRY dude. And busy.

Okay, so in a medium stockpot on medium heat, I poured some oil  and the diced onion and garlic. Let that simmer a bit then put in 4 or 5 frozen chicken tenders. After the chicken was mostly cooked (still a little pink in the middle, but that doesn’t matter because you cook it more) I took the chicken out and cut it up in smaller, bite-sized pieces. Put it back in and let it simmer more while I got other stuff ready. Then I added a little bit of wine to degrease the pan and get all that cooked yummy stuff up from the bottom and circulating in the soup.

I poured in 1 cup of rice, 2 cups of water, the can of Cream of Chicken soup, about half a cup of half & half (but in hindsight maybe a full cup would be best), stirred it all up and turned the burner to medium-low to simmer. I set the timer for 20 minutes and walked away. After 20 minutes I checked the rice and it was still a little firm so I added a little more half & half (probably for a total equivalent of 1 cup of half & half, but I tend not measure) and I also added 1 tbsp of butter. I also added a couple shakes of Tastefully Simple’s Onion Onion and Garlic Garlic because the flavor to add a touch more flavor. (Also, Cayenne would probably have been good but I didn’t try that because of the kids.) 10 more minutes on the timer.

At the end of 10 minutes it was perfect. Just the right consistency – not too runny because I’m not a huge fan of runny, brothy soups – but good creamy broth, yummy, flavorful chicken and overall a filling meal. I think broccoli would have been an excellent addition to the soup as well but I didn’t have any at the time. We’ll try that next.

My husband thought it was very good. He heated it up when he got home, added milk to thin it (because he likes a runnier soup) and he ate an entire big bowl. My kids? *sigh* They would not touch it. Frown. They saw that I made soup and ran screaming from the room. Seriously? What’s wrong with these kids? I was picky when I was a kid but, hello, rice? Chicken? That’s a no-brainer! So I made them heat up their own Chef Boyardee while I ate my yummy soup. So there.

Quick. Easy. Yummy.

Happy eating,

Stef

A dinner inspired by Feta

Have I mentioned that I love cheese? LOVE it.

Sometimes I want a certain kind of cheese and it inspires the entire meal. One night last week it was feta cheese.

I HEART FETA CHEESE.

I try to keep feta on-hand for feta emergencies. (What? It could totally happen.)

I like it plain. I like it in salads. I like it in pasta dishes. Now I even like it with sauteed chicken.

This is not my picture. I borrowed it. I promise I will give it back. Eventually.

Sometimes I buy it in blocks like this pic – often from the Ballard Cheese people (No, I don’t know them – I just love their cheese). Other times I just buy whatever is convenient – like the pre-crumbled Athenos brand that most grocery stores carry.

So last week I decided to make chicken with feta and basil from our garden. So stinkin’ simple.

Here’s the quick & dirty:

I simply sauteed frozen, unbreaded chicken tenders (we always keep a bag of  unbreaded chicken tenders in our freezer. They are much more versatile than frozen breasts!)  in butter & olive oil and added some garlic, salt & pepper, and minced up basil leaves.

I sauteed at medium heat with a covered lid – to keep it juicy – and then for the last 10 minutes or so left the lid off and added some Greek vinaigrette marinade/dressing to the pan. Once it was cooked I crumbled feta over the top and then put the lid back on and let it rest a bit while we finished the rest of the food prep.

My husband, Eric, has been on a white bean dip streak. He made hummus the previous week but felt the consistency was very thick and the garbanzo beans are harder to work through the food processor. This time he tried plain white beans called Cannellini beans. He mixed the beans, olive oil, minced garlic (real garlic cloves he cut up. Gotta keep fresh garlic on hand.), lemon juice and minced basil to a yummy deliciousness in the food processor. (Try to get most of the lumps out!) Eric thought the consistency was a little too runny, but I thought it was fine and the taste was fab.

Then he warmed some pita bread on the stove and cut it into triangles for dipping.

But we also wanted more. Just . . .  more.

And we realized that our little bubba, our pickiest eater, wouldn’t eat either of the things we made. So we whipped up a boxed Parmesan couscous. He loves couscous more than I can possibly explain to you and it couldn’t be easier to make. (Especially out of the box, but I’m sure on it’s own it would be just as delish and easy too. And maybe better than the boxed variety. Hmm, I should try that.)

Then we realized we had a baguette we needed to use. It was the crusty, thin kind – just the absolute best for making crostini. So I sliced a bunch of thin ovals and covered them with butter. Generally speaking, I like to use a spray bottle of olive oil for this purpose – but our bottle is on the fritz and, honestly, the butter gives a better flavor than the olive oil. Maybe the olive oil is better health-wise than the butter, but in flavor YOU CAN’T BEAT BUTTER. Then I arranged the bread rounds on a cookie sheet and threw them under the broiler until they were a golden brown.

Tastefully Simple Spinach & Herb Dip Mix

I had pulled out some cream cheese to soften so I just took this Spinach & Herb dip mix I had on hand and mixed a whole bunch of it into the cream cheese to top the Crostini.

NOTE:  In the interest of full disclosure I should mention that I just signed up to be a consultant for Tastefully Simple  – where I got this Spinach & Herb dip mix – but I also want to be clear that I’ve been using this stuff for about a year so this is not a fly by night, promoting my new product, kind of thing. My bottle of the Spinach & Herb mix is almost empty due to repeated use. I use it in cream cheese for Crostini (as I’m discussing here), on/in scrambled eggs, in dip mixes with sour cream, or mayo and sour cream, or mayo and Greek plain yogurt, or in seasoning steamed, buttered veggies. It’s one of the more versatile seasonings in my spice cupboard.

Then I spread the spinach herb cream cheese mix on the golden brown Crostini and DONE. Incidentally, I also served this exact same Crostini as an appetizer for a dinner we hosted a couple weeks ago and everyone just loved it.

So here was the end result of our meal. In hindsight, a salad or some steamed zucchini or broccoli would have been fabulous to offset the starchiness –  but at the time we didn’t have those on hand.  It was soooooo good though. Yummy. I had never made chicken with feta before but I see us doing that again sometime soon.

Happy cooking!

The best BLT+C ever ever ever

This summer we spent several Saturday mornings at the Capital City Farmer’s Market in downtown Boise. I love it. (I’ve posted about it before, here).

One of my favorite things about the market is the cheese booth. It’s actually the Ballard family cheese booth and they make all their cheeses here in Idaho. Then they sell them to people like ME who love cheese. Yum.

One day in late July we were at the market and I made my usual beeline for the cheese booth. I had a few samples, swoon, and then I realized the dude behind the booth was grilling cheese. Yes, grilling. No bread. He added some spice and grilled it in a skillet. Then he handed me a piece and I said, “I’ll take it!”

Turns out it’s Halloumi cheese. Halloumi is a Greek cheese with a high melting point so it can actually be grilled, and slightly browned, without melting.

I immediately started thinking – what can I do with this?

I started looking around my kitchen. Okay, I had half of a baguette (because I love a good baguette and try to keep one on hand most of the time) so I immediately thought sandwich. Then I rummaged in the fridge and found bacon, grape tomatoes, and a spring salad mix. And thus the best BLT+C was born.

Toast or grill the buns.
Season the Halloumi to your preference and grill it.
Bacon. Sometimes I bake it. Doesn't matter. Cook it however you normally do.
Grape tomatoes. Any tomatoes will do. This is just what I had on hand. On hand. See? Get it. Ha ha.
Start assembling. Mayo first, then I pulled the arugula out of the spring salad mix, and then I trimmed off all the fat and just use the meaty bacon parts.
Add the sliced up tomato bits.
Fini!

I made 4 of these sandwiches and wrapped them up for a picnic. A few hours later when we pulled them out to eat they were just perfect. Crunchy, salty, cheesy, bacony. So yum. Try it.

-Stef


UPDATE:  My husband asked for these again this weekend and I made a couple tweaks that I wanted to share with you. I think this batch was even better than the first!

  • We used ciabatta rolls and I grilled them in about 2 tblsp butter in a big skillet on the stove at medium heat until they were deliciously browned. (Buttered the rolls and the pan).
  • For my Mayo spread I combined Mayo, Sweet Hot Mustard & Habanero Mustard. It was YUM. Mostly mayo and just a dollop or two each of the other depending on how you like it.
  • I grilled the Halloumi in the bacon grease. First I drained almost all the grease out of the pan but then I grilled the cheese on low-medium heat in the same pan. I also sprinkled the cheese with seasoned salt. It was good, but you can omit this step if you want to cut back on the salt.
  •  We used heirloom tomatoe slices fresh out of a friend’s garden.
  • We used a handful of baby arugula that we had bought in a package. We don’t eat a ton of arugula, but we can share it with our tortoise, Bob. (The arugula, not the sandwich).

End result was deliciousness. The tomato and mayo spread just oozed up into the airy ciabatta bun making the sandwich messy and good. The Halloumi was squeaky and tasty. Just a perfect sandwich. My husband told me no less than 5 TIMES how much he enjoyed it.

3 words: Chocolate Mug Cake

Warning: this post is for chocoholics. If you are not a chocoholic then you may want to go on your merry way until I get around to my next post about something that isn’t about chocolate. It might be a while.

A few weeks ago my husband sent me a link to a microwaveable mug cake recipe that he wanted me to make. This is unusual because, generally speaking, he doesn’t like me to bake. I mean, he likes baked goods as much as you and I (well, maybe not as much as I) but he’s trying to lose weight. I, on the other hand, am watching my weight . . . watching it stay the same.

We’re not going to talk about that right now. Moving on.

So this past Friday night the boys were asleep (or in bed, at least) and the hubby went outside to smoke a cigar (deplorable habit) and I wanted a little something. Just something dessert-like. With chocolate, of course.

IT’S NOT DESSERT UNLESS IT’S MADE WITH CHOCOLATE.

Then I remembered the mug cake recipe! Excellent idea. Microwaveable so super easy, right? I tracked down the recipe in my email inbox and quickly skimmed the ingredients list.

Whoa, what’s self-rising flour? Seriously, I have to buy a special flour? Time to do some Googling.

I was happy to find out that it’s super easy to make self-rising flour. Essentially for each cup of all-purpose flour you just need to add 1 1/2 teaspoons of baking powder and 1/2 teaspoon of salt and then mix together. Easy-peasy lemon squeezey. I made a cup of it and stored it in my pantry for future mug cakes.

I didn’t have Nutella (or Justin’s Nut Butter which, according to my friend Joni, is even better than Nutella and possibly better for you) so I ran to the store.

At 10:30 at night in my comfy clothes. Needless to say, MUST.HAVE.CHOCOLATE. prevailed.

No Justin’s Nut Butter in my local Albertson’s so I picked up the Nutella and some whipped cream. Normally I make whipped cream from scratch but I was trying to make things simple and quick so I got a can.

10 minutes later I was sitting on my sofa, turning on House Hunters International and eating chocolate cake out of a mug.

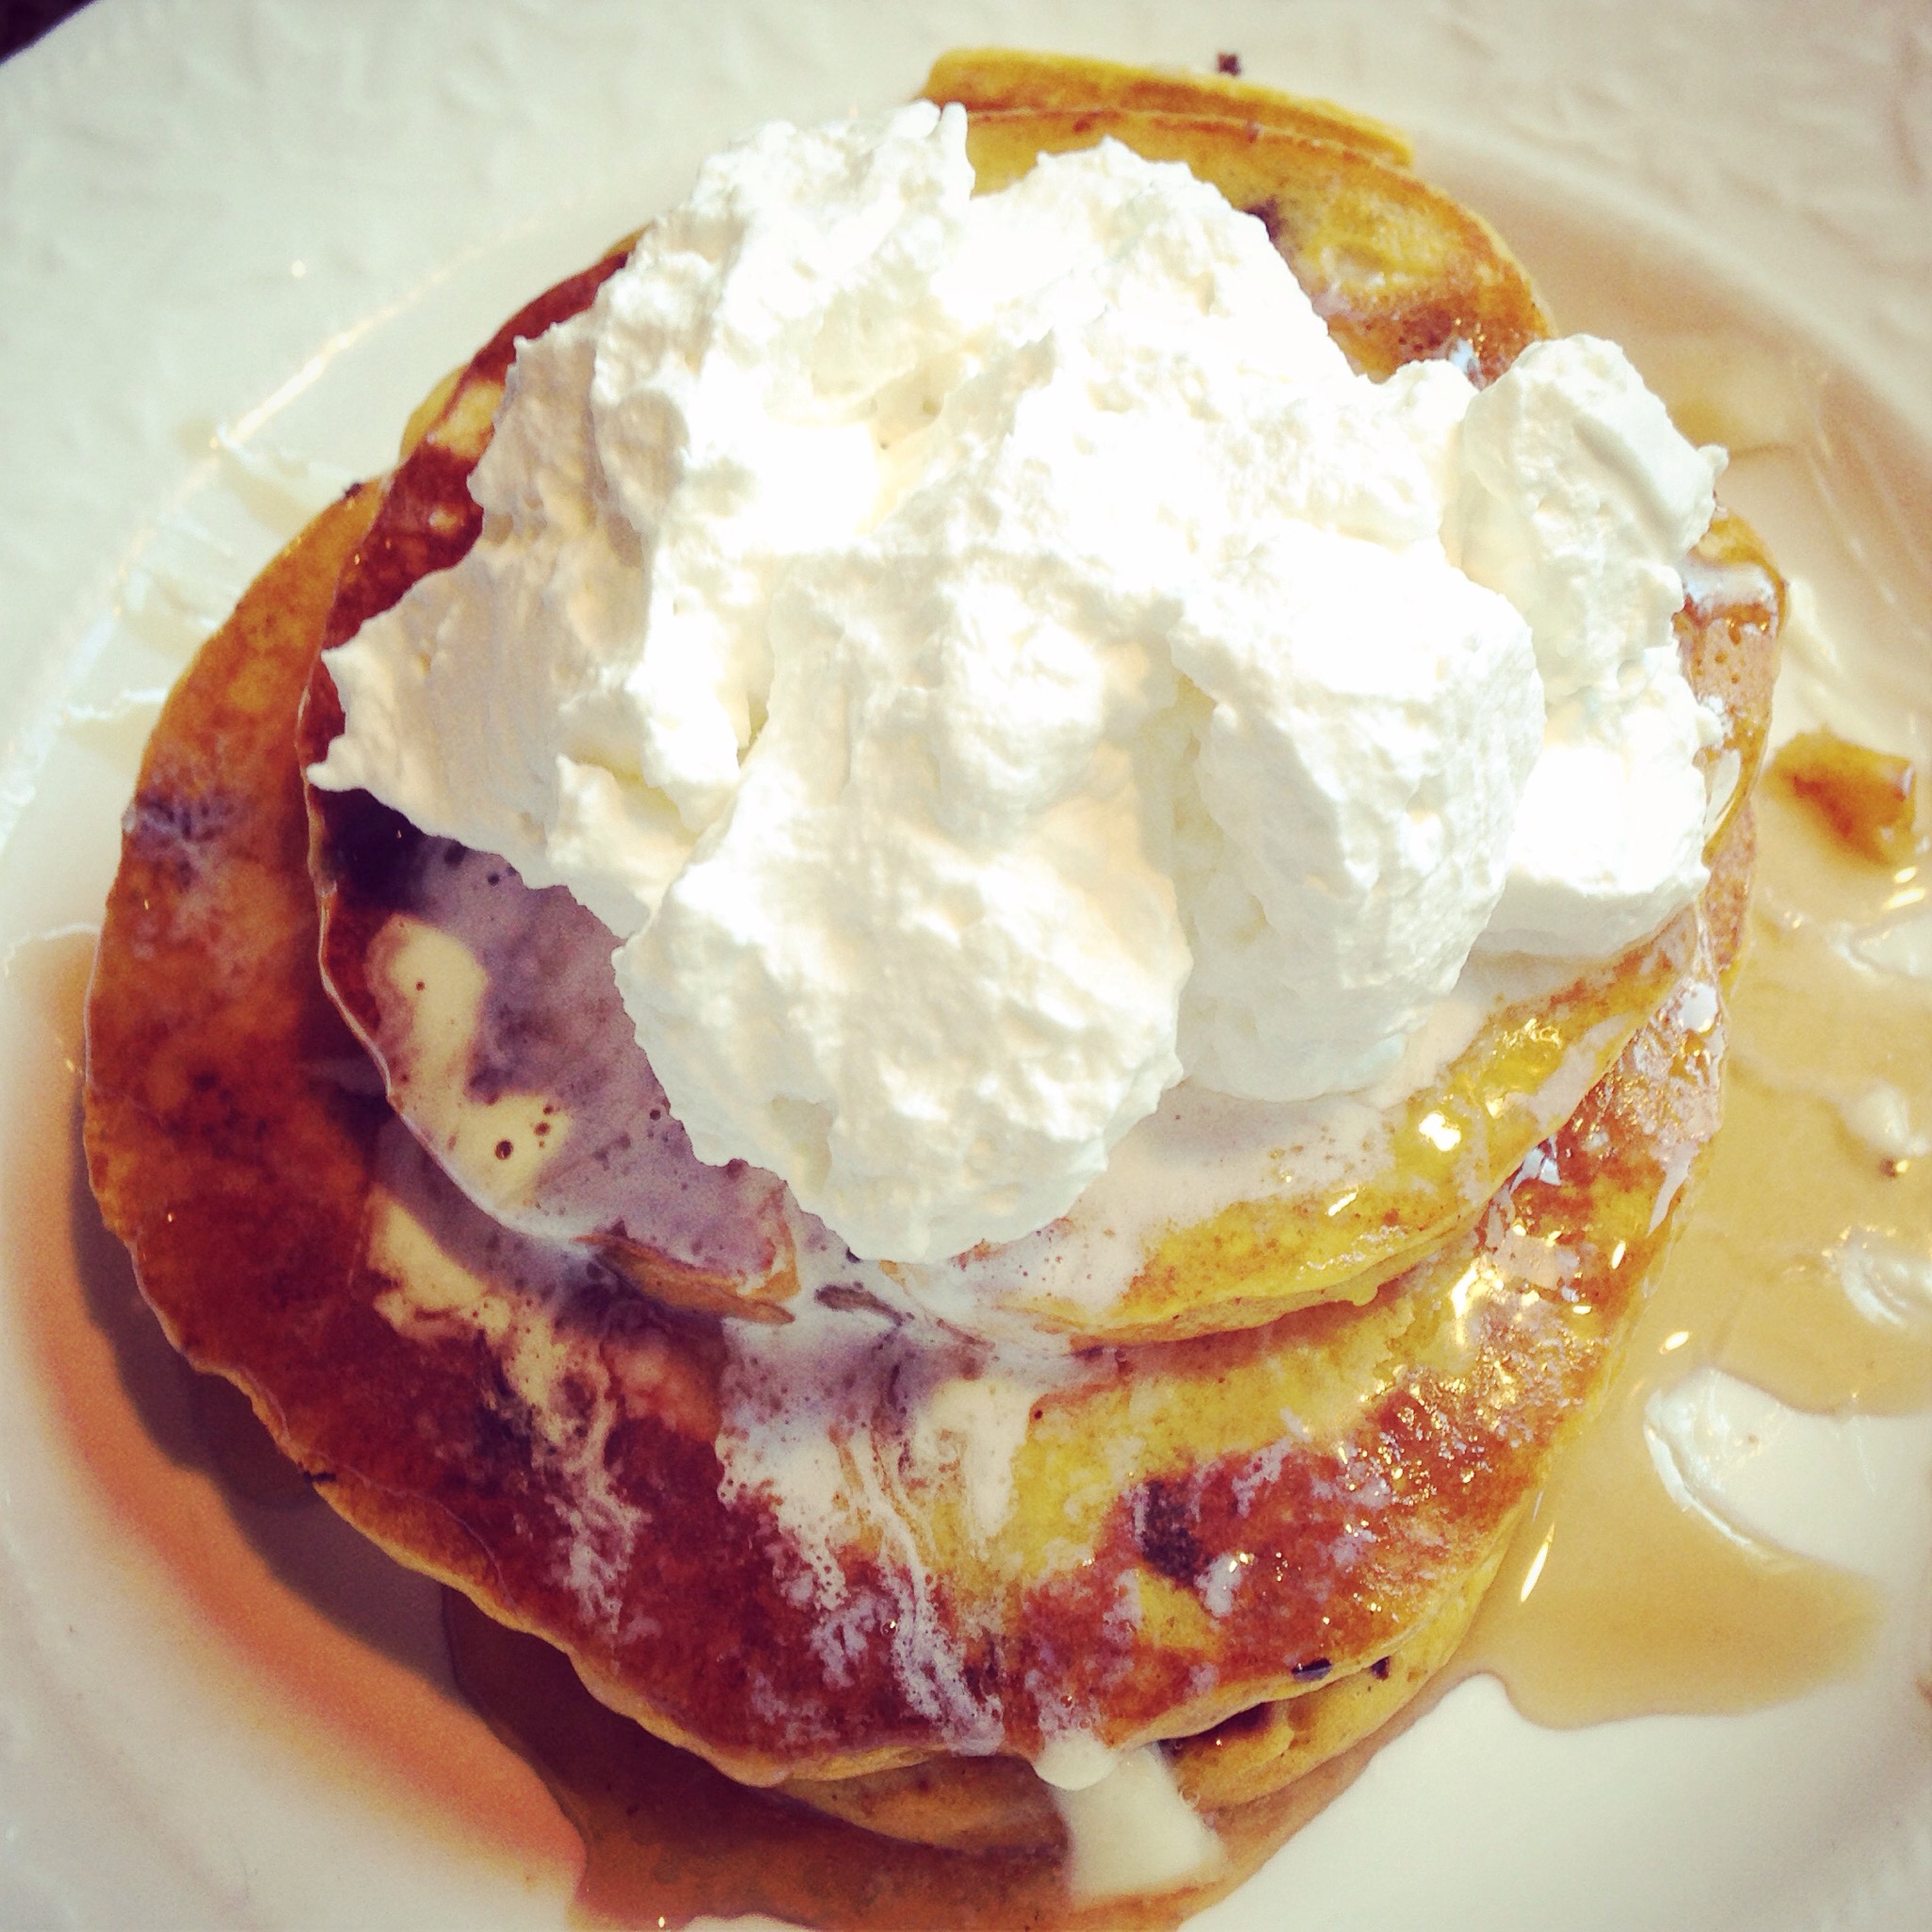
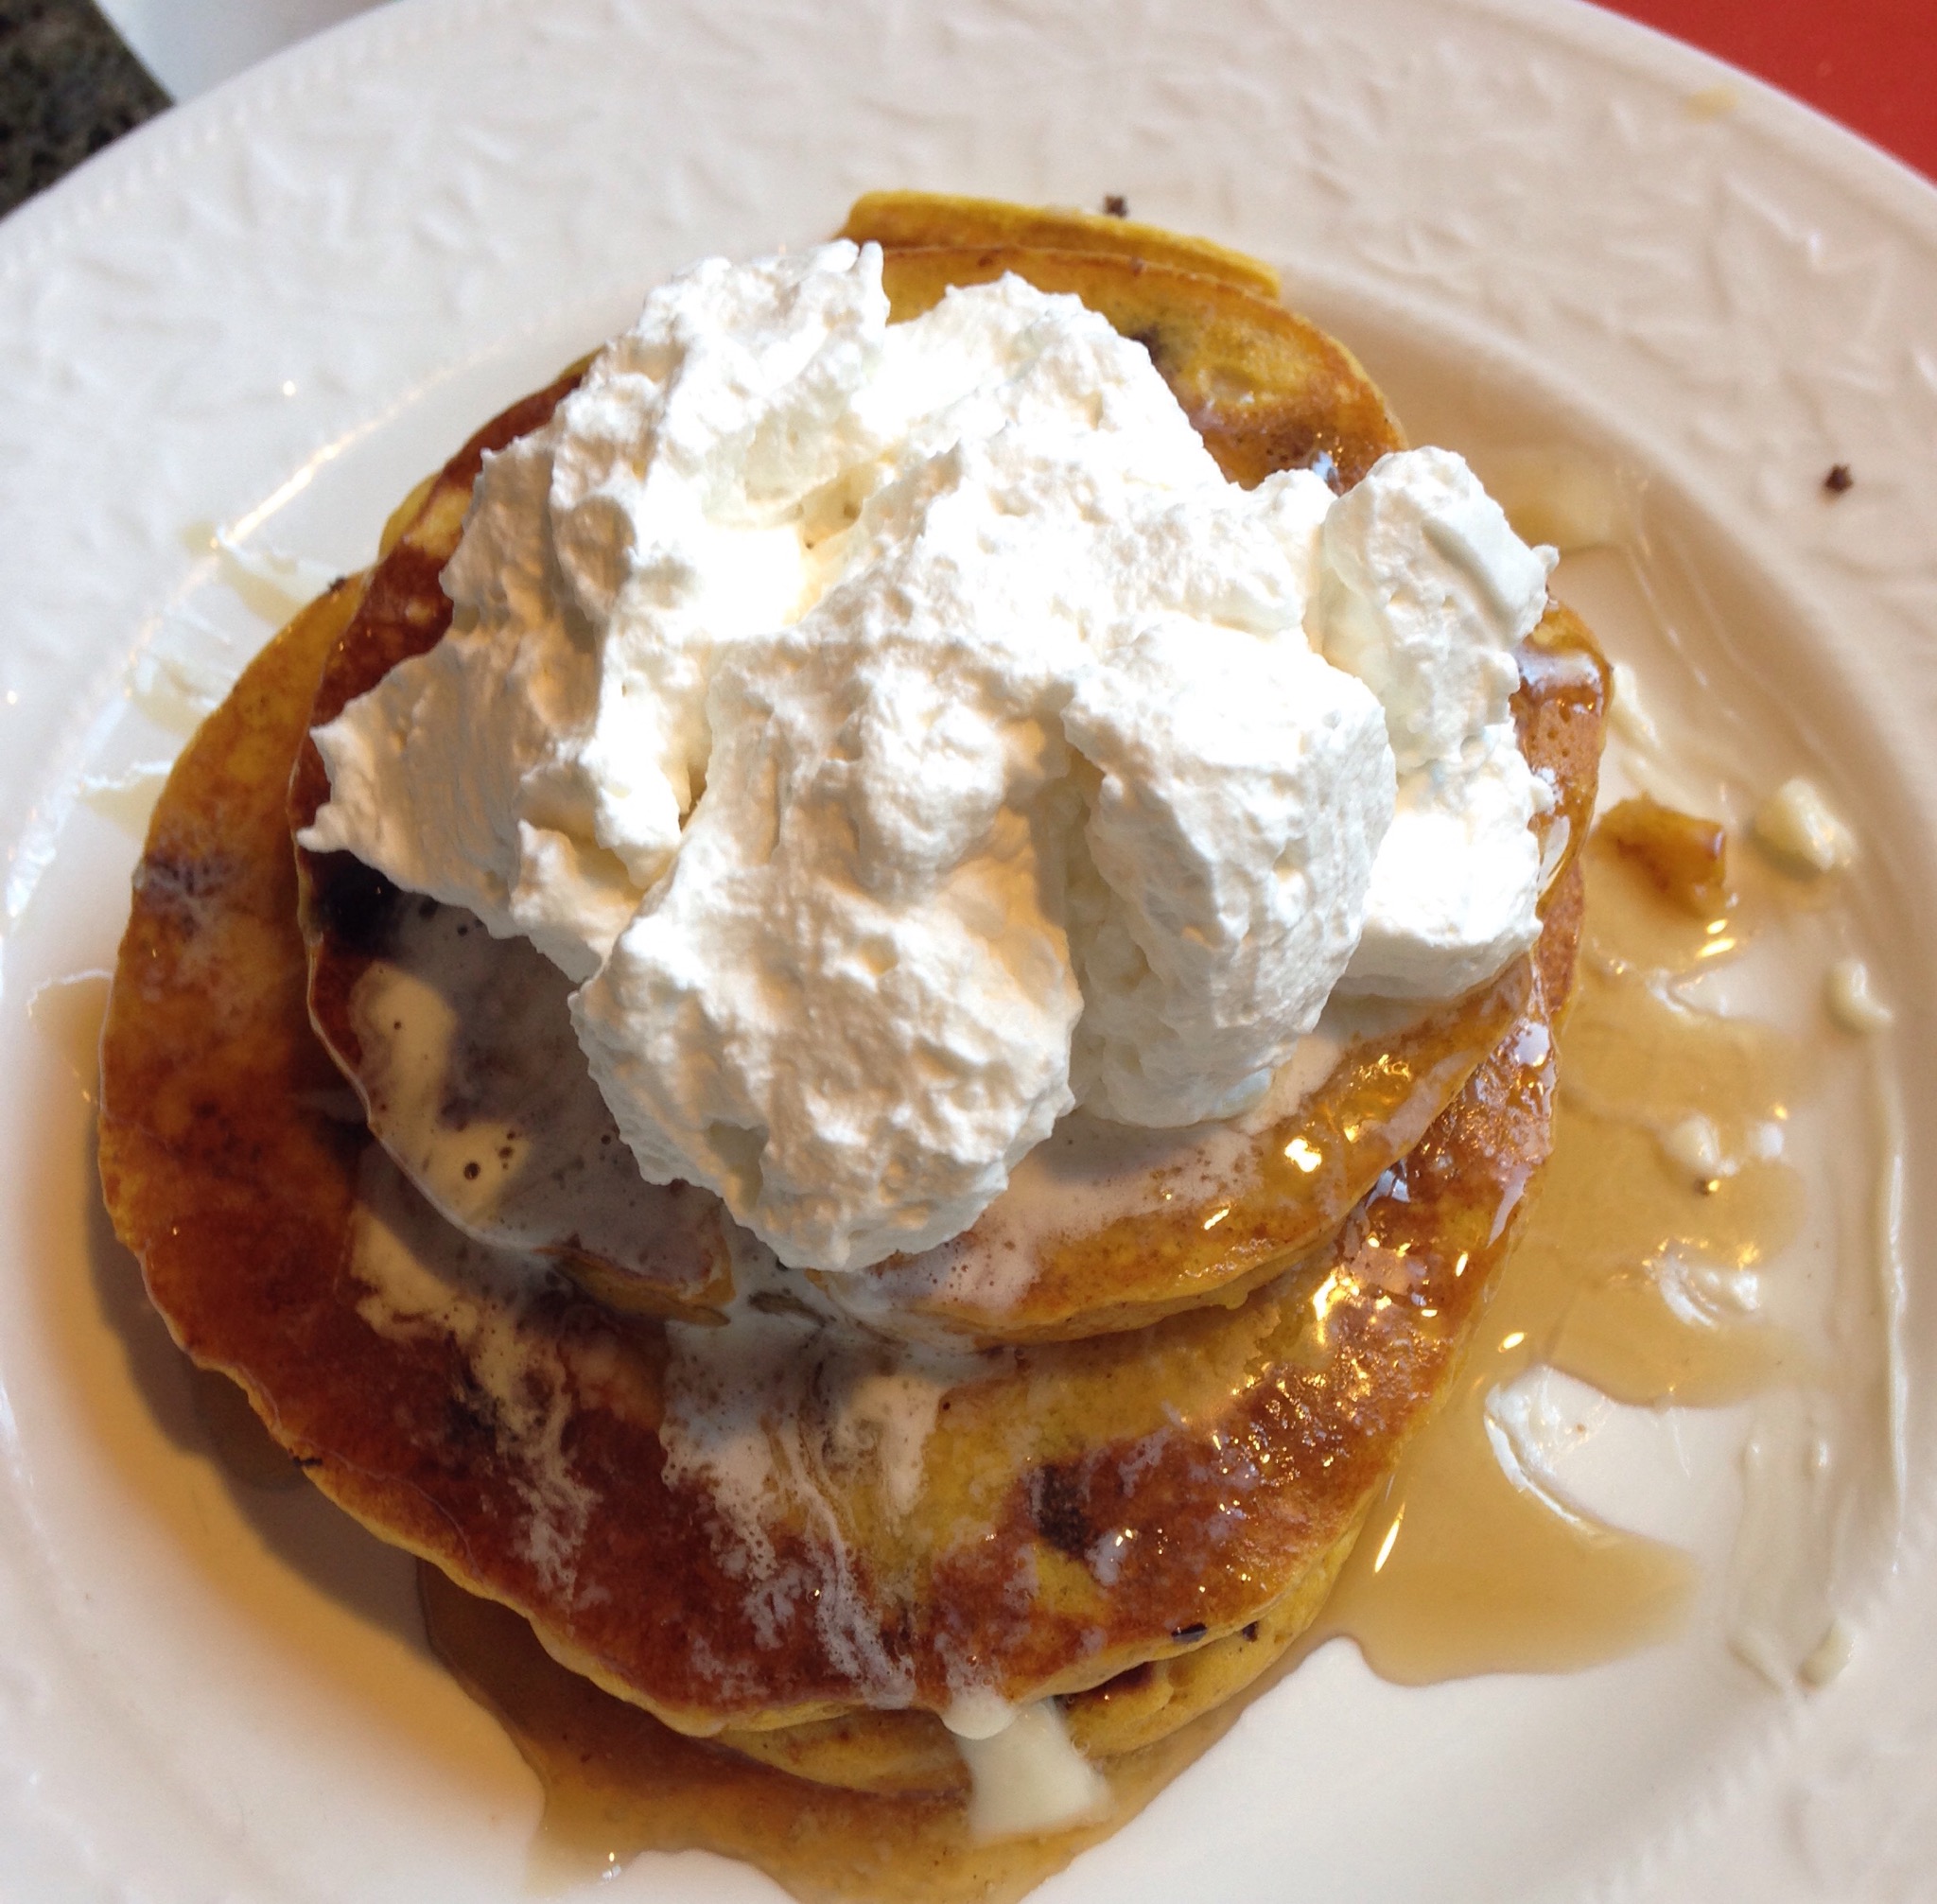
I was, in fact, eating this very thing:

Here’s the full recipe & instructions:
Nutella Mug Cake
4 tablespoons self rising flour
4 tablespoons white granulated sugar
1 egg
3 tablespoons cocoa powder
3 tablespoons Nutella (or Justin’s Nut Butter)
3 tablespoons milk
3 tablespoons oil (vegetable or canola preferably)

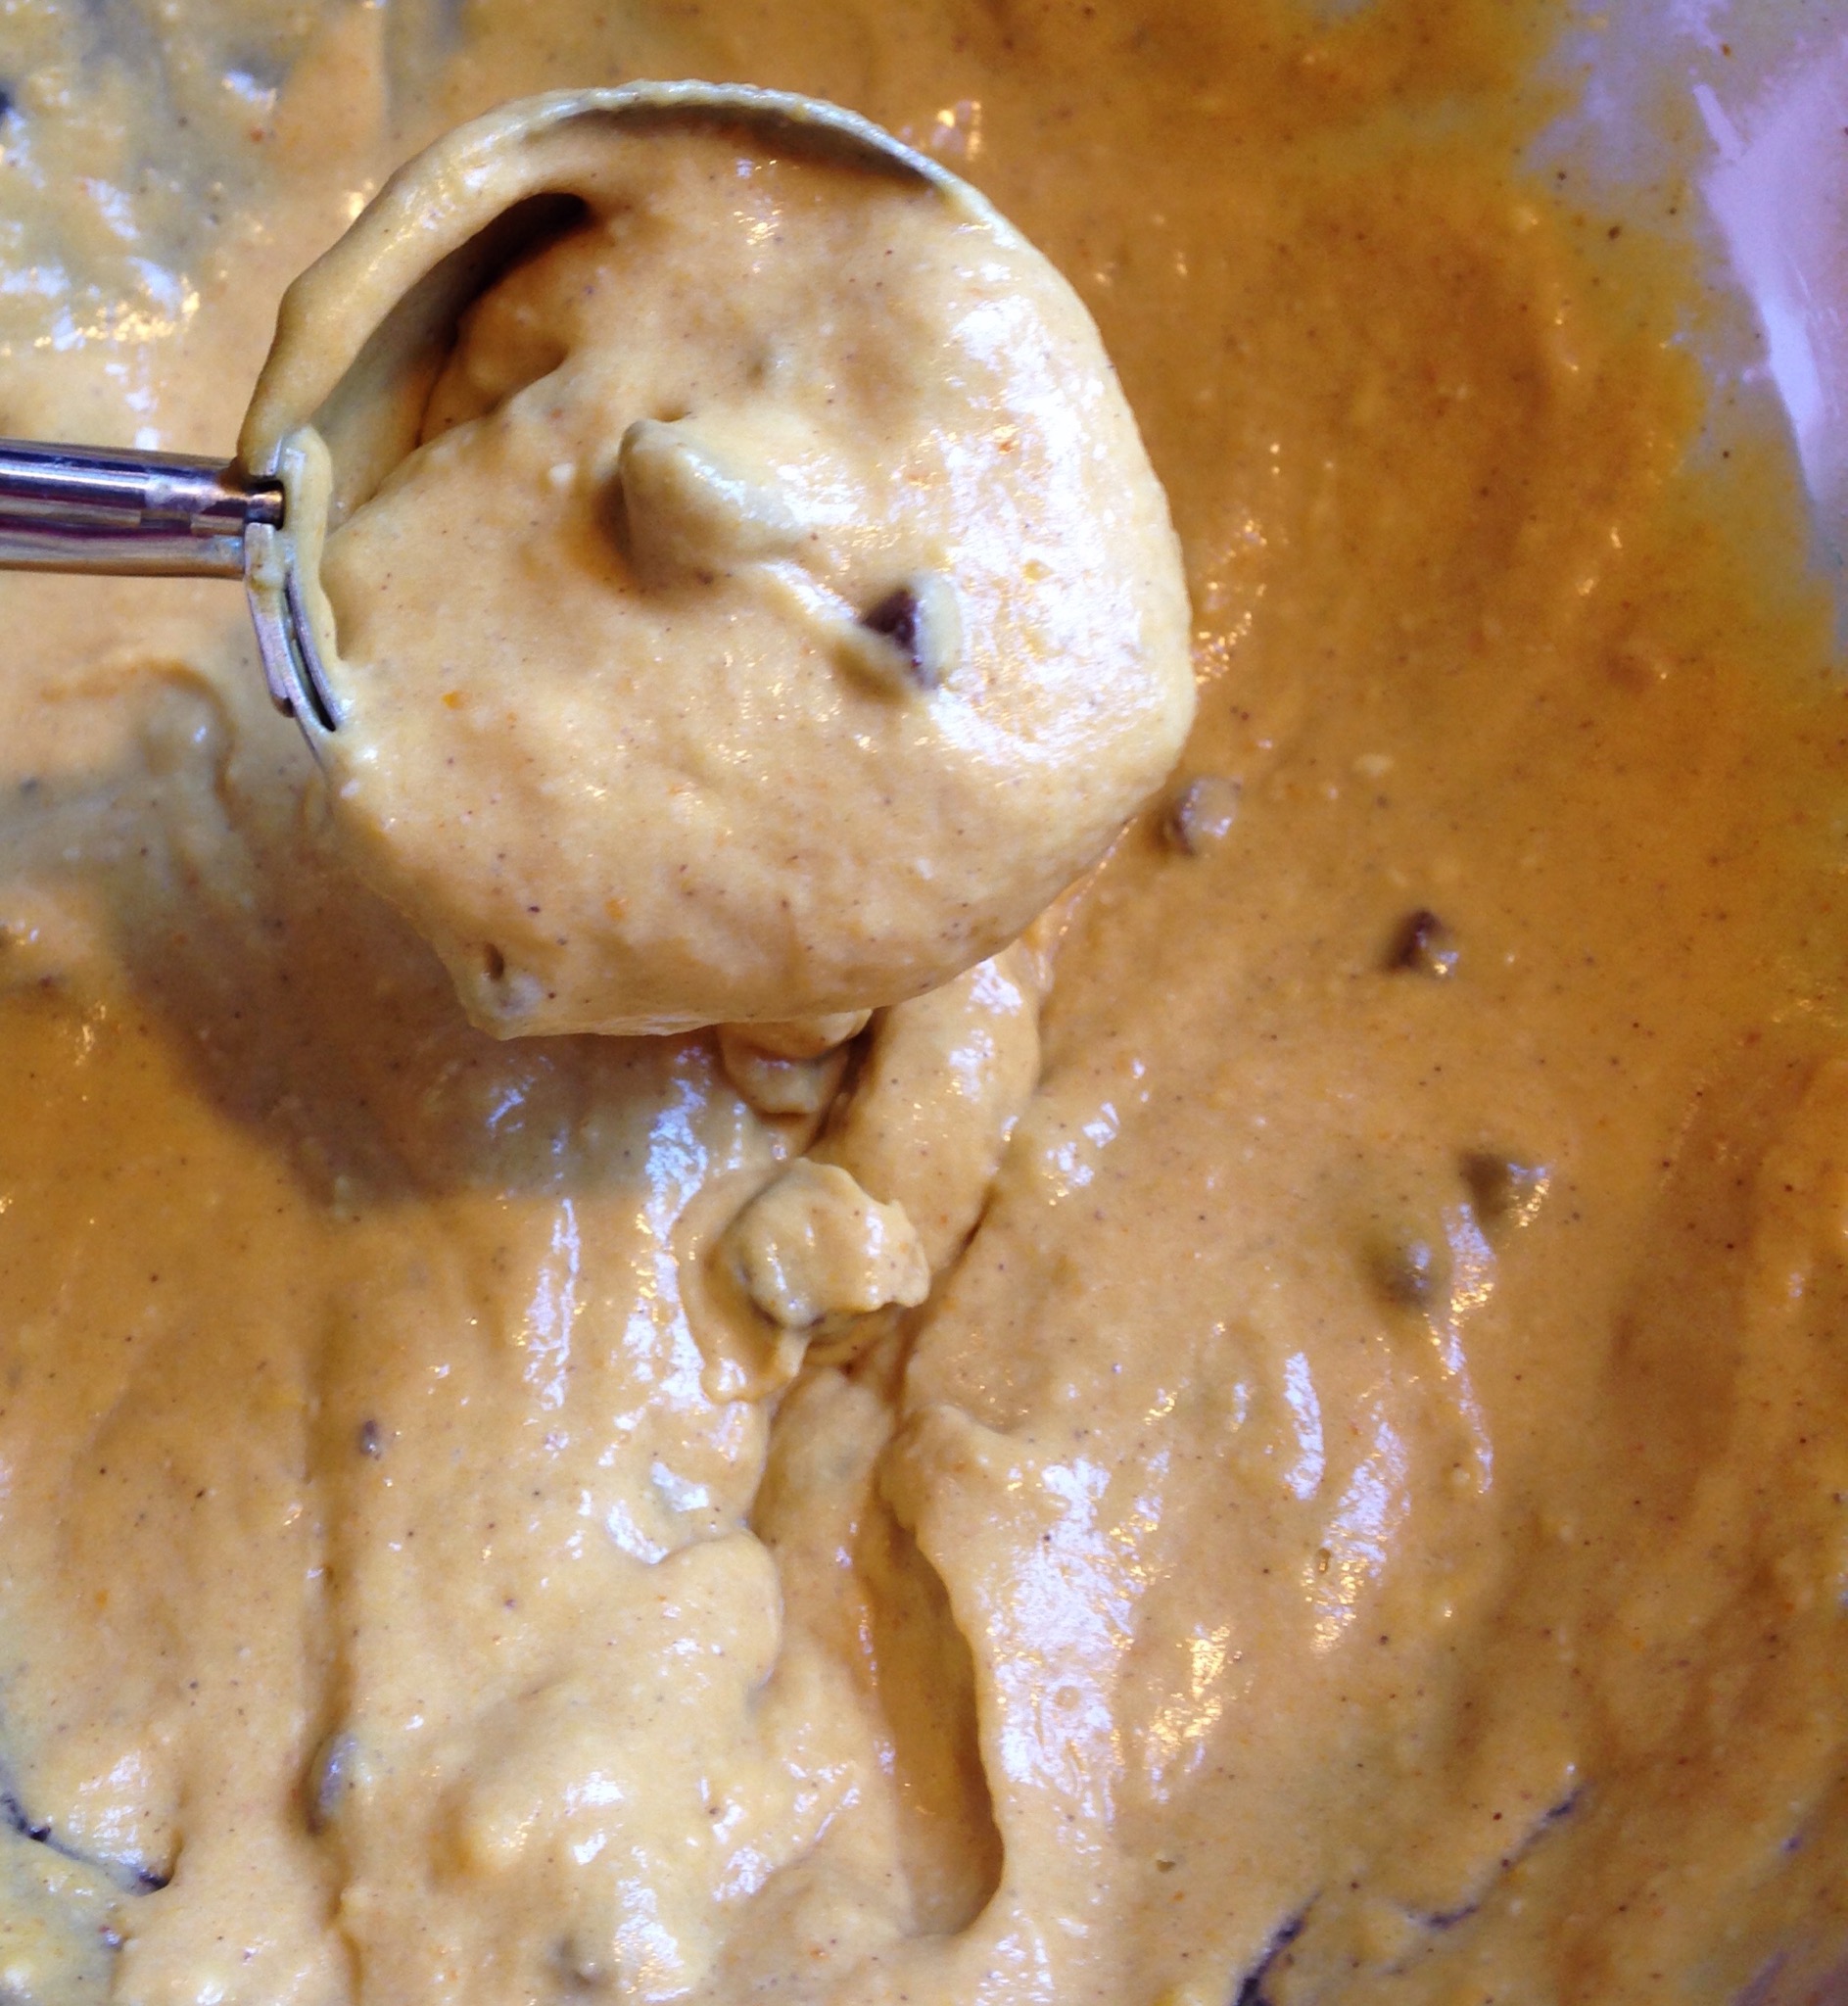
Combine all ingredients in a large coffee mug (the large part is IMPORANT. Think gigantor latte cup.) Whisk well with a fork until smooth. Microwave on high for 1 1/2 – 3 minutes. Time depends on microwave wattage. (Mine took 1 minute, 40 seconds). If you cook it too long it will be dry. The top should look kind of wet but if you stick a toothpick in (or a finger, like me) then it should be cake-like inside.
Like this:

I topped with whipped cream, chocolate syrup & a sprinkle of cinnamon. I have a suspicion that warm, soft caramel drizzled on top of the cake and then topped with whipped cream would be freakin’ fantastic. Mmm. Let’s just pause and think about that for a minute. Mmm-hmm.

The recipe makes 1 very large serving. This is a perfect shared dessert with your honey if you are feeling all romantical. If your honey is being a butthead then DO NOT SHARE. This is serious stuff, man.

I luuuurve chocolate but I could only eat about half and then put the rest in the fridge for the hubby the next day. (Yes, the next day. Due to the previous butthead note. So on Saturday morning I told him what I had made and he bee-lined for the fridge. He ate half of it cold but I think it was even better after I warmed it in the microwave for 30 seconds or so).

It doesn’t have a real Nutella flavor that I could detect. I wonder if playing with the amount of Nutella, or changing when the Nutella is added (like after it’s all mixed up, or mid-cooking process) would provide more of that hazelnut flavor. Hmmm, if you try any variations please let me know.

Enjoy!

(I should note that neither Nutella, Justin’s Nut Butter nor Albertson’s knows me and I’m not endorsing any particular product or business. Except for chocolate. We are tight like whoa).